
Espresso planet blog
Milk Frothing and Steaming Instruction Guides
|
Frothing and Steaming Milk Guide
|
|
 |
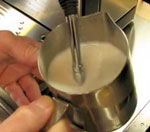
In order to create thick milk foam for Cappuccino or velvet milk for Latte, air needs to be mixed with milk. This is achieved by "pulling" air into the milk using the steam velocity exiting the steam nozzle on the steam wand. To control the amount of air pulled into the milk, surf the surface of the milk with the steam nozzle tip. Listen to the sound. A hissing sound indicates air mixing. Don't go too far away from the surface, otherwise large bubbles will form.
Note that each steam nozzle tip design will deliver different results. Don't get frustrated as this takes a lot of practice. |
 |
Pulling Air
Submerge the steam wand all the way into the milk and then open the steam valve. Now, slowly lower the pitcher until the steam nozzle tip is just even with the surface of the milk. A hissing sound indicates air being pulled into the milk. If you want to create thick foam for Cappuccino, maintain the pulling of the air. If you attempt to create Latte Art, do not pull too much air into the milk as you need a velvety milk texture (Micro Foam). Alternate between pulling and rolling of the milk. Once the milk temperature has reached 36 ?C we go to the mixing step: |
 |
Mixing Air
Now that we have foam floating on top of the milk, we need to mix the foam with the milk below. Also referred to as "pulling". Raise the pitcher a bit higher and offset the steam wand from the center of the pitcher. This allows the milk to roll. |
 |
Rolling Milk
Continue to roll the milk and do not steam beyond 70 ?C otherwise the milk gets scalded. The rolling process causes the larger milk bubbles to flatten out. This is very important when attempting to create Latte Art. |
 How To Create Latte Art


